 Drawing area Drawing area
Drawing area (paper) is displayed on the screen with a blue dotted line. It shows what part of the picture is to be printed. Scale and/or paper size changes are displayed on the screen. You can also move the paper with mouse by grabbing it from the small rectangle in the lower left corner.
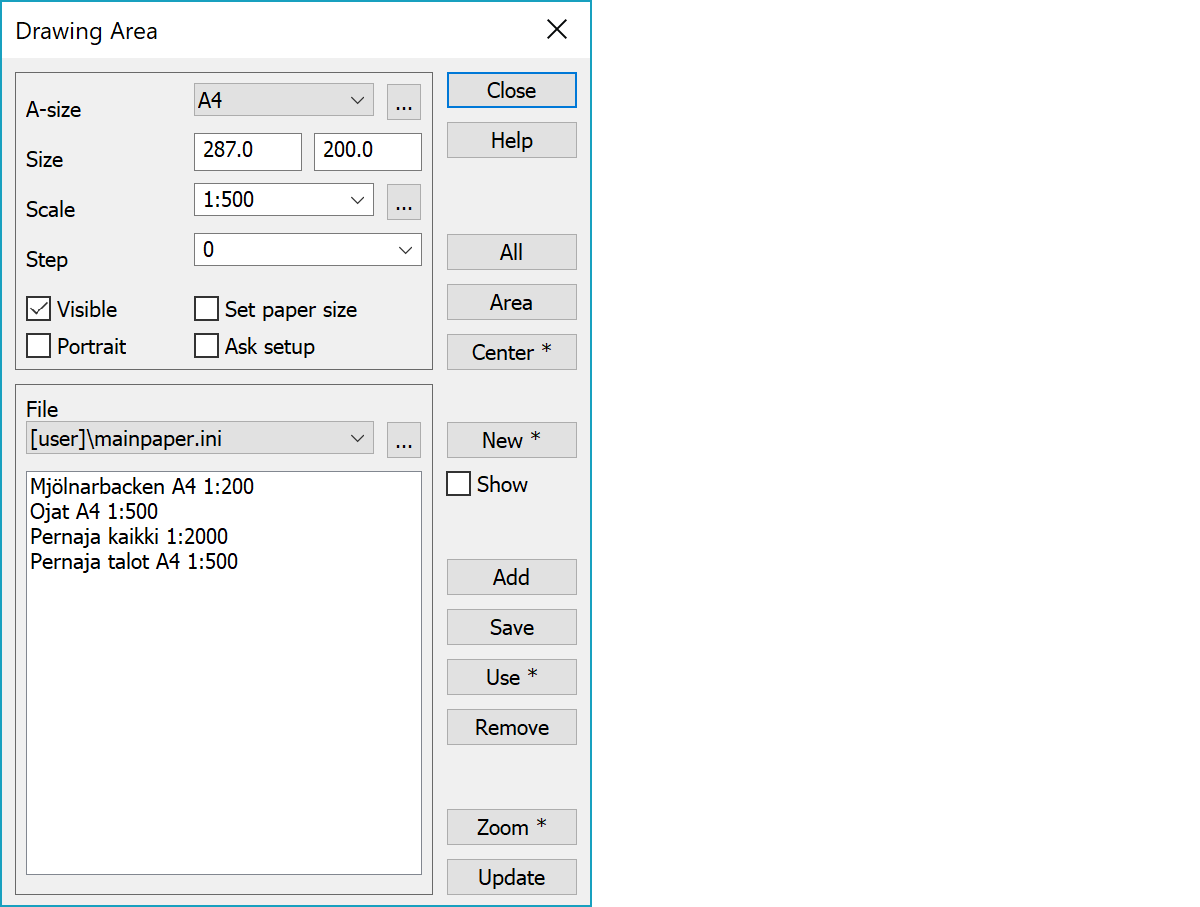
Paper size code. Use Special setting SizeList to set paper sizes you want to be displayed in the list. You can choose the codes and sizes to suit your printer. e.g. A1, A4. Adjacent browse button allows list content editing.
Note, that some printers cannot print to whole paper area. This problem can be solved by defining smaller paper size. E.g. A4=280,190
Paper size selection with the Alt-key keeps the existing drawing area and changes the scale.
Paper size in millimeters. Horizontal and vertical measurement.
Printing scale can be chosen from the list, or given. Adjacent browse button allows list content editing.
You can precisely set the step parking, so that the defined print area is moved in steps of a pre-determined distance. Units are given in meters, to the nearest whole meter (e.g. 1m, 4m, 10m etc.). This enables you to place the print area, so that the lower-left corner is in a certain coordinate position. This is useful, for example, when printing to multiple papers. List remembers ten last used values.
You can choose whether the blue dotted line, which shows the paper size, is visible on the screen. Area can be printed even if it is not visible.
Orientation of the paper in the horizontal or vertical (landscape or portrait). This setting also changes the paper orientation in the Windows print manager. You can change the Windows setting before printing.
Send selected paper size to printer for paper tray selection.
Asks page setup before printing.
Choosing the printing scale so that all the visible files fit on the paper.
You can check in which scale your picture will be drawn and where it will fit. Paper size scale changes to a theoretical scale, which you can then adapt or print as it is.
You’ll find the function also in Print menu.
You can drag with the mouse the rectangular area you want printed. The scale will be calculated from the shown area. Paper size will set the shape of the area, so if you drag a square with the mouse, the shape will be changed so that it is similar to that of the given paper size, but it will cover the area shown.
If the selected area is different than current paper orientation (Portrait/Landscape), paper orientation will be changed automatically. Paper size scale changes to a theoretical scale, which you can then adapt or print as it is.
You’ll find the function also in Print menu.
Centers the paper to screen without changing the scale. The paper does not necessary come to view, but might remain outside of the screen depending on the scale. With the Shift-key centers the paper to the active point.
You’ll find the function also in Print menu.
File can used to save or load paper settings to ini-file with user selected name. Only paper size, scale, step and position are saved. List remembers ten last file names and browse button can be used for file selection. Name list below displays all saved paper settings in the file.
Asks file name and creates new empty file for paper settings saving. With the Shift-key make copy of current file. With the Alt-key removes selected paper file.
When the setting is on, all paper positions in the file are drawn to screen. Currently selected paper is red and others are green.
Asks new name, adds it to the list and saves paper settings to it. With the Shift-key copies name from the selected list item.
Asks name and saves paper settings overwriting currently selected item in the list.
Uses paper settings from name selected in the list. Works also by double clicking the list. With the Shift-key also zooms to paper.
Asks confirmation and removes selected name from the list.
Zooms display to current paper. With the Shift-key zooms to all papers in the file.
Redraw the screen using settings in the dialog.
If the total point amount in visible element list files is less than the value given in the file settings, the screen is updated automatically after after checkbox and list selection changes. Update can also be forced by holding down Alt-key.
There are some special settings related to this function.
Comma separated list of printer names not using new DirectDraw.
Comma separated list of printer names using paper dimensions instead of portrait/landscape setting.
See also: Using special settings